Working with Aluminum (Part 1)

Posted by HB on Friday, August 26, 2011 , under | comments (1)


Now that you’ve heard about aluminum, you may want to know what it looks like. We’ll describe it, beginning with the forms in which it is produced, how these forms are shaped and altered to become structural components, and how these components can be dressed up with coatings. We will include some comments on how this process differs from the preparation of steel for duty and will conclude with a few suggestions on how to put the structural components in to place. This chapter, then, presents the product forms in which aluminum is most commonly used for structural components, and how these product forms are fabricated and erected.


1. PRODUCT FORMS


The forms of aluminum used in structural components include extrusions, flat-rolled products, castings, and forgings. The most widely used of these forms are extrusions and the flat-rolled products, sheet and plate. Castings typically have less reliable properties than the wrought product forms, and forgings are often more expensive to produce than other wrought forms. Castings and forgings do, however, lend themselves to more complex shapes than extrusions and flat-rolled products.


1.1 Extrusions

Introduction What do aluminum and Play-Doh have in common? They can both be extruded, of course (Figure 1). Extrusions are produced by pushing solid material through an opening called a die to form parts with complex cross sections. Aluminum is not the only metal fabricated this way, but it is the most readily and commonly extruded. (Stainless steel can also be extruded, but it requires such great pressures that only small and simple stainless shapes can be made). The extrusion process makes aluminum an extremely versatile material for structural design. Rather than being limited to the standard rolled shapes, designers can concoct their own cross sections, putting material where it is needed. Solid and hollow cross sections, even sections with multiple hollows, can be readily extruded (Figure 2).


Engineer of the future extruding a Play-Doh I-beam

Figure 1. Engineer of the future extruding a Play-Doh I-beam. (Play-Doh is a
registered trademark of Kenner.)

Examples of complex extruded shapes

Figure 2.  Examples of complex extruded shapes. (Courtesy of Cardinal Aluminum
Co.)


While extrusions dominate applications for parts with a constant cross section, bar and rod are also produced by rolling, and tubes and wire by drawing,  a process by which material is pulled (as opposed to pushed) through a die to change the cross section or harden the material. Cold-finishing may be used to improve surface finish and dimensional tolerances. Sometimes a combination of methods is used; for example, tube may be extruded and then drawn; bar may be rolled and then cold-finished. Products that have been cold-finished or drawn are held to tighter tolerances on cross-sectional dimensions than extruded products.


Standard Extruded Shapes Before World War II, most aluminum shapes were produced by rolling, like steel, and so had cross sections similar to those of steel. Many of these shapes had sloped flanges that facilitated rolling but complicated connection details. Wartime and postwar demand for aluminum products prompted better production techniques, especially extrusions, which eventually displaced much of the rolled production. Since extrusions are not subject to the limitations of the rolling process, the need for sloped flanges was gone. Extrusions continued to be produced in shapes that looked like rolled products, however, because these shapes were standard. Around 1970
the Aluminum Association introduced standard channel and I-beam shapes designed to be extruded, with constant thickness flanges and optimum dimensions for strength (Figure 3). Today, almost no aluminum shapes are produced by rolling. Many of the old cross sections suited to production by rolling are still shown in catalogs, however, even though today they are extruded, not rolled.


Rolled shape with sloped flanges

Figure 3. Rolled shape with sloped flanges, and extruded shape with constant thickness
flanges.

A number of common extruded shapes are shown in extruders’ catalogs. Some of these shapes, as well as the Aluminum Association standard shapes, are included among those listed in the Aluminum Design Manual, Part VI, Section Properties. Extruders usually maintain an inventory of dies. Some are proprietary and, thus, are for the exclusive use of a particular customer; others are called open dies, and these are the shapes shown in catalogs and available to any paying customer.


The Aluminum Association has established standard extruded I-beam and channel shapes, as mentioned above, in depths from 2 to 12 in. (They are not available in hard metric sizes.) These sections are efficient for structural applications and are produced by a number of extruders. Appendix B contains dimensions and section properties for these shapes, called Aluminum Association standard channels and I beams. Design data for these shapes is given in Appendices D and E.


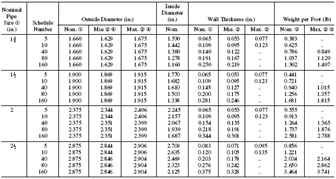
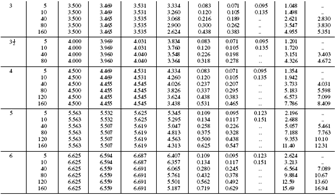
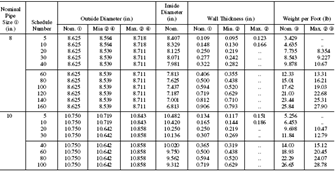
Aluminum pipe, with the same dimensions as steel pipe of the same nominal size and schedule, is also extruded, in diameters up to 12 in. Dimensions and section properties are listed in Table 1. Aluminum pipe is usually 6061-T6 alloy, but it is also produced in 3003-H18 (but only under 1 in. nominal pipe size), 3003-H112, and 6063-T6.


Custom Extruded Shapes Sometimes the Aluminum Association or other standard shapes are impractical or inefficient for a specific application. In these cases, users may design their own shapes. Keep in mind that some limitations exist :


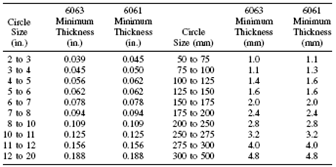
1)  Minimum Thickness: The minimum thickness is a function of a number of factors, including the circle size (larger shapes require larger wall thickness) and whether a shape is hollow or solid. Table 2. provides approximate guidelines, but actual limits depend on the shape and the extruder. Elongation testing is not performed for shapes less than 0.062 in. [1.6 mm] thick.


2)  Maximum Length: Extrusions can be produced up to 100 ft [30 m] long, but 40 ft [12 m] is generally the practical limit for extrusions shipped by truck. Structural shapes available from metal supply warehouses usually are stocked in 20 ft or 25 ft [6 m or 7.5 m] maximum lengths.


3)  Maximum Circle Size: Extrusions are produced from billets, which are usually cylindrically shaped. Because of this, extrusion cross-section size is usually limited to that which fits within a circle. Larger extrusion presses use larger circle size dies. There are numerous 10 in. [250 mm] and smaller presses, about a dozen mills with presses larger than 12 in. [300 mm], while the largest in North America is 31 in. [790 mm]. Because of production limitations, an extrusion typically cannot fill the full area of the circle, but rather only part of the circle area (Figure 4).


4)  Maximum Area: The largest cross-sectional area that can be extruded is about 125 in2 [80,600 mm2].

5)  Maximum Weight: The maximum total weight of an extrusion is limited by the weight of a billet to about 4,300 lb [2,000 kg].


Diameters, Wall Thicknesses, Weights—Pipe TABLE 1. Diameters, Wall Thicknesses, Weights—Pipe


Diameters,Wall Thicknesses,Weights—Pipe(continued)

TABLE 1. Diameters,Wall Thicknesses,Weights—Pipe(continued)


Diameters, Wall Thicknesses, Weights—Pipe


Diameters, Wall Thicknesses, Weights—Pipe

TABLE 1. Diameters, Wall Thicknesses, Weights—Pipe (continued)


image


➀ In accordance with ANSI/ASME Standards B36.10M and B36.19M.
➁ Based on standard tolerances for pipe .
➂ Based on nominal dimensions, plain ends, and a density of 0.098 lb per cu in., the density of 6061 alloy. For alloy 6063, multiply by 0.99, and for alloy 3003 multiply by 1.011.
④ For schedules 5 and 10, these values apply to mean outside diameters.$


Approximate Minimum Thicknesses for 6061 and 6063

TABLE 2a. Approximate Minimum Thicknesses for 6061 and 6063
Solid Extrusions


Approximate Minimum Thicknesses for 6061 and 6063

TABLE 2b. Approximate Minimum Thicknesses for 6061 and 6063
Hollow Extrusions


Useable portion of an extrusion circle size

Figure 4. Useable portion of an extrusion circle size. Extrusion profiles must generally
fit within the area indicated by the dotted line

Value Management

Posted by HB on Monday, August 22, 2011 , under | comments (0)


1. INTRODUCTION


Value management (VM), value engineering (VE) and value analysis (VA), are terms that are being used more and more frequently; but what do they mean? Most design organizations have a concern for value and have processes and design reviews to address owner requirements and the cost of any proposed scheme. Capital cost is certainly one element of value but general experience indicates that the cheapest is not always the best and a broader understanding of value is needed.


It is increasingly recognized that not only do design organizations need to provide assets that meet the owner's specification and are built to time and within budget but that the potential project maximizes the benefit to the owner's business. At the earliest stages of project thinking the owner specification is an expression of a number of perceived and/or actual 'needs'. As design proceeds and the cost of meeting those needs emerges it is often necessary to recycle the design to provide a scheme that is more acceptable to the owner. In the same way, as design proceeds, additional opportunities can be generated that could bring additional benefits to the owner's business.


It is a key role of the design organization to enter this debate of value and need at the earliest stages of design. Experience shows that 'loose discussion' and 'asking the owner what is wanted' is unlikely to be enough, and design organizations need to be able to get close to the owner, under- stand the needs and provide solutions which not only give good capital value but also enhance the business. It is this presentation of need and cost in a different form that VM techniques address. VM and associated techniques should not be seen as displacing normal design reviews but as providing a different perspective to the owner which is not apparent from the normal engineering specification and cost estimate.


2. DEFINITION OF VALUE


Value can be described as the relationship between satisfaction of need and the cost of resources required to achieve that satisfaction. This can be expressed as:


value = satisfaction of need

               cost of resources


From this relationship it is clear that value can be enhanced by improving the level of satisfaction as well as reducing the resources needed. In some cases the level of satisfaction might be improved to such a degree that an increase in resources is justified. In most cases capital cost is an important resource but operating and lifecycle costs and availability of skills could figure in the equation.


It is worth recognizing that different interests in a project have different needs; for instance a factory manager could be looking for ease of maintenance while the sales manager might value a quicker order lead time. VM techniques seek to provide mechanisms by which these differing interests and needs can be brought together.


3. VM DEFINITIONS


Although the terms value management, value analysis and value engineering are widely used, there is not total agreement on definitions. The European Union is working on an overall approach to the understanding, practice and training for value management within the EU and clarification of terms is expected.


However, it is generally accepted that VM covers a range of value improving practices, particularly those used for early conceptual thinking and the 'softer' front end issues of a project, while VA and VE are more usually used to cover studies of the traditional 'harder' issues at the later stages of design. Commonly, the term VE is used for studies at the project cost level with VA used to describe more detailed component analysis. However, some organizations transpose these terms.


It is possible to consider four broad levels of review as shown in Figure 1. The cost of change at the later stages of design is also greater as design proceeds. Although obvious, this point is often forgotten and expectations can be created that VENA studies at the later stages of design will deliver substantial cost-benefit opportunities. This is unlikely as major changes cannot usually be tolerated because the delay and cost of making changes is unacceptable. This often results in only minor changes of a cost cutting nature being made, which should have been identified by normal design/cost reviews. Thus the distinctive contribution that VM can make is not realized, and at worst the VM process is devalued.


Levels of review    Figure 1. Levels of review


The reviews can be described as below:


  • A technology/business review confirms the business strategy and establishes a broad understanding of the technology and overall operating and other requirements.


  • A conceptual review establishes or confirms the overall project scope and, if orders of cost are available, confirms that the broad design and requirements are considered 'good value'.


  • A project cost review is a more detailed examination of a proposed scheme carried out when the specific engineering elements have been specified and can be looked at to confirm that the design is optimal in meeting the requirements defined at the concept stage.


  • A plant item or component review considers the design of specific items.


4. TIMING OF STUDIES


The opportunity to make savings or other changes diminishes as the project approaches detail design and financial authorization is given for purchase of equipment and other engineering works - see Figure 2.


Opportunity/cost of change relationship within project timetable

Figure 2. Opportunity/cost of change relationship within project timetable


5. VALUE MANAGEMENT METHODOLOGY AND JOB PLAN


In general VM embraces three elements which together provide the uniqueness of the approach. These are :


1. team based working;

2. a structured 'job plan';

3. use of the principle of 'functionality' or 'need'.


The first two are not unique and are characteristics of many problem solving techniques. The latter is the distinguishing feature of most forms of VMIVENA techniques. 'Functionality' is used to describe what the component, system, plant or project is trying to achieve. For example, the 'function' of a door might be to provide privacy, provide security, create the right image or a combination of all three. This distinction provided by using 'functional' descriptions is not apparent from the engineering description 'door'. Describing components in this way enables costs of items fulfilling the same function to be added together, thus allowing the owner to understand the overall cost of that function. Taking the previous example, it might be that if an element of the door is primarily for image then other elements that are there for the same reasons can also be included within the functional description. A better understanding of the overall costs and options for providing the image function can be assessed - including that for the managing director's office! 'Functional' descriptions also differ from conventional engineering descriptions in that many items of equipment fulfil more than one function without this distinction being apparent from the cost estimate.


The principle of functionality can also be used to help develop the scope of a proposed project. A successful chemical plant project will not just have the main process function of 'react feed stocks' but will probably have other process functions such as 'recover materials', 'remove impurities', 'achieve product form', etc. There will also be functions such as 'ensure operability', 'make safe', 'protect the environment', 'provide for the future', 'improve customer service', etc. These are all typical functions for a process plant, the costs of which are not apparent from a normal engineering specification and cost estimate. It is these other functions that determine whether an asset will be 'world class' or ahead of the competition and not just a copy of that being used by others. It is critical, therefore, that these functions are properly defined and explored.


It is normal to present functional descriptions in the form of a FAST - functional analysis system technique - diagram. A feature of this type of diagram is that the hierarchy of needs/functions enables costs and opportunities to be understood at different levels. An example of a FAST diagram for a chemical plant is shown in Figure 3. From this it can be seen that 'assure product quality' could be considered at different levels, i.e. change the product specification, change the process technology to give a more effective process, change the equipment type or change the detail design of the selected equipment. All of these present opportunities with different levels of ease of implementation and trade off. This form of presentation gives an enhanced view of the project that is not apparent from a normal engineering estimate.


Typical FAST diagram   Figure 3. Typical FAST diagram


A feature of the FAST diagram is that it is developed from the left-hand side by asking 'how?' and from the right-hand side by asking 'why?' It is this questioning that enables the fundamental purpose to be established. For instance, asking 'why a distillation column?' could give a variety of answers including: 'remove impurities', 'recover material' or 'concentrate the product'. These different descriptions give a quite different perspective of the need for a distillation column and the possible options, e.g. different process, equipment, operating (get someone else to do it) or commercial. A further feature of the FAST diagram which leads to greater clarity is the use of 'verb-noun' descriptions of functions. For instance 'increase product quality', might probably require a quite different solution from 'maintain product quality'.


5.1. The Job Plan


The job plan helps to work in an ordered and systematic way. The main phases of the job plan that are commonly used during design development are as follows.


Information phase


The information phase involves defining the project, gathering the available information, establishing constraints and carrying out a function analysis to describe 'What is it we want the project to do?' rather than 'What are the physical components of the project?' It is at the start of this phase that the level of study and potential team members should be defined.


Creative phase


During the creative phase the team uses the functional descriptions, normally presented in the form of a 'function' or 'FAST diagram' to explore alternative ways for accomplishing the desired functions. 'Brainstorming' is usually used to generate ideas.


Evaluation and analytical phase


The ideas generated during the previous phase are screened and evaluated by the team during the evaluation and analytical phase. Normally, some form of decision evaluation technique would be used to help during this phase.


Development and recommendation phase


During the development and recommendation phase the team reviews the selected ideas and agrees on the proposals to be adopted or requiring further investigation.


Presentation phase


The presentation phase involves the presentation of the agreed design proposal including any outstanding developments.


Implementation phase


It is important to see that the recommendations are developed and progressed during the implementation phase. Often, a lot of energy is put into the first five phases over a fairly short period but as implementation is over a longer period and involves people not involved in the initial review, momentum can be lost.

The job plan is not meant to be prescriptive but is there to help a team to work systematically through the design phase. Judgement is needed to structure the job plan to suit the level of study and complexity of the project.


5.2 The study team and resource


There is a view that studies interrupt the design process. The opposite is the case. Properly set up studies enable the interested parties to come together and conduct a comprehensive and orderly review of the project, particularly at the early stages of design. In many cases the study can take the place of normal design reviews and team meetings. Reviews present the opportunity for people not normally engaged in the design process to be involved. It is only the owner and interested parties that represent the owner's various interests that can change the scope of the project, the engineering team can make recommendations, and then only if they understand the wider aspects of the project.


As for most team based activities, the size of the study is important. Too many or too few participants results in the study being unmanageable or there not being sufficient interaction of ideas. A team of five to eight people is ideal and selecting the team often gives a good insight into who is really important in the project decision process.


The formal team based stages of a study, i.e. construction of the function diagram, speculation and evaluation, can normally be carried out over a half to two days for each phase with breaks to summarize and generate more data. Thus, over a period of one to two weeks, most small to medium- sized projects can be reviewed. In some cases a very detailed analysis of a large scheme down to the component level will take longer, but note needs to be made of previous comments on the opportunity to make significant changes.


6. CONCLUSION


Although the value management techniques that have been described are based on well-established and proven techniques there is the need to recognize that the experience and track record of the 'study leader' is critical to success. For any individual to become proficient and suitably experienced it is recommended that study leaders should be carrying out approximately one study a month. There is the temptation to believe that engineers and designers who have attended a VM training course are able to lead VM reviews. The experience needed to underwrite a sound theoretical under- standing of the techniques can only - as in any activity - be gained through practice and the personal learning that takes place. The techniques need to be used flexibly and with imagination: a too mechanistic application can sometimes miss the issue and the study leader needs to be aware when to adapt the technique to draw out the real issues. This requires the study leader to be able to draw on other techniques and methodologies to support development of solutions to the issues raised by the formal 'function' analysis.

The Relationship Between Structural Form and Structural Efficiency

Posted by HB on Thursday, August 11, 2011 , under | comments (0)


1. Introduction

This chapter is concerned with the relationship between structural form and structural performance. In particular, the effect of structural geometry on the efficiency1withwhich particular levels of strength and rigidity can be achieved is explored.The shapes of structural elements,especially the shapes of their longitudinal axes in relation to the pattern of applied load, determine the types of internal force which occur within them and influence the magnitudes of these forces. These two factors – the type and the magnitude of the internal force created by a given application of load – have a marked effect on the level of structural efficiency which can be achieved because they determine the amount of material which must be provided to give the elements adequate strength and rigidity. A classification system for structural elements is proposed here based on the relationship between form and efficiency. Its purpose is to aid the understanding of the role of structural elements in determining the performance of complete structures. It therefore provides a basis for the reading of a building as a structural object.

2. The effect of form on internal force

Type Elements in architectural structures are subjected principally either to axial internal force or to bending-type internal force. They may also be subjected to a combination of these. The distinction between axial and bending is an important one, so far as efficiency is concerned, because axial internal force can be resisted more efficiently than bending-type internal force. The principal reason for this is that the distribution of stress which occurs within the cross-sections of axially loaded elements is more or less constant, and this uniform level of stress allows all of the material in the element to be stressed to its limit. A size of cross-section is selected which ensures that the level of stress is as high as the material concerned can safely withstand and an efficient use of material therefore results because all of the material present provides full value for its weight. With bending stress, which varies in intensity in all cross-sections (Fig. 1) from a minimum at the neutral axis to a maximum at the extreme fibres, only the material at the extreme fibres can be stressed to its limit. Most of the material present is under stressed and therefore inefficiently used.The type of internal force which occurs in an element depends on the relationship between the direction of its principal axis (its longitudinal axis) and the direction of the load which is applied to it (Fig. 2).

Fig. 1 (a) Elements which carry purely axial load are subjected
to axial stress whose intensity is constanta cross all cross-sectional planes.
(b) Pure bending-typeload (i.e. load which is normal to the axis of the element)causes bending stress to occur on all cross-sectional planes. The magnitude of this varies within each cross-section from a maximum compressive stress at one extremity to a maximum tensile stress at the other.

 
Fig. 2 Basic relationships between loads and structural elements.
(a) Load coincident with principal axis; axial internal force.
(b) Loadperpendicular to the principal axis; bending-type internal force.
(c) Load inclined to the principal axis; combined axial and bending-typeinternal force

If an element is straight, axial internal force occurs if the load is applied parallel to the longitudinal axis of the element. Bending-type internal force occurs if it is applied at right angles to the longitudinal axis. If the load is applied obliquely, a combination of axial and bending stress occurs.The axial-only and bending-only cases are in fact special cases of the more general combined case, but they are nevertheless the most commonly found types of loading arrangement in architectural structures.If an element is not straight, it will almost inevitably be subjected to a combination of axial and bending internal forces when a load is applied, but there are important exceptions to this as is illustrated in Fig. 4.3. Here, the structural element consists of a flexible cable,supported at its ends, and from which various loads are suspended. Because the cable has no rigidity it is incapable of carrying any other type of internal force but axial tension; it is therefore forced by the loads into a shape which allows it to resist the loads with an internal force which is pure axial tension. The shape traced by the longitudinal axis is unique to the load pattern and is called the ‘form-active’2shape for that load.
 
Fig. 4.3 Tensile form-active shapes. Because it has no
rigidity a cable must take up a shape – the form-active
shape – which allows it to resist the load with a purely
tensile internal force. Different load arrangements produce
different form-active shapes

As is seen in Fig. 4.3 the shape which the cable adopts is dependent on the pattern of load which is applied; the form-active shape is straight-sided when the loads are concentrated at individual points and curved if the load is distributed along it. If a cable is allowed simply to sag under its own weight, which is a distributed load acting along its entire length, it adopts a curve known as a ‘catenary’ (Fig. 4.3).

An interesting feature of the form-active shape for any load pattern is that if a rigid element is constructed whose longitudinal axis is the mirror image of the form-active shape taken up by the cable, then it too will be subjected exclusively to axial internal forces when the same load is applied, despite the fact that, being rigid, it could also carry a bending-type internal force. In the mirror-image form all the axial internal forces are compressive (Fig.4.4).

Fig. 4.4 Compressive form-active shapes

The cable structure and its rigid ‘mirror image’ counterpart are simple examples of a whole class of structural elements which carry axial internal forces because their longitudinal axes conform to the form-active shapes for the loads which are applied to them. These are called ‘form-active’ elements.

If, in a real structure, a flexible material such as steel wire or cable is used to make an element, it will automatically take up the form-active shape when load is applied. Flexible material is in fact incapable of becoming anything other than a form-active element. If the material is rigid, however, and a form-active element is required, then it must be made to conform to the form-active shape for $the load which is to be applied to it or, in the case of a compressive element, to the mirror image of the form-active shape. If not, the internal force will not be pure axial force and some bending will occur.

Figure 4.5 shows a mixture of form-activeand non-form-active shapes. Two load patterns are illustrated: a uniformly distributed loadacross the whole of the element and twoconcentrated loads applied at equal distancesacross them. For each load, elements (a) carrypure bending-type internal forces; no axialforce can occur in these because there is nocomponent of either load which is parallel tothe axis of the element. The elements in (b)have shapes which conform exactly to theform-active shapes of the loads. They aretherefore form-active elements which carryaxial internal forces only; in both cases theforces are compressive. The elements (c) donot conform to the form-active shapes for theloads and will not therefore carry pure axialinternal force. Neither will they be subjected topure bending; they will carry a combination ofbending and axial internal force.

Fig. 4.5 Examples of the relationship between elementshape, load pattern and element type. The latter isdetermined by the relationship between the shape of theelement and the form-active shape for the load patternwhich it carries. (a) Non-form-active (bending stress only).(b) Form-active (axial stress only). (c) Semi-form-active(combined bending and axial stress).

So far as the shape of their longitudinalaxes are concerned, structural elements canthus be classified into three categories: form-active elements, non-form-active elementsand semi-form-active elements. Form-activeelements are those which conform to theform-active shape of the load pattern which isapplied to them and they contain axialinternal forces only. Non-form-activeelements are those whose longitudinal axisdoes not conform to the form-active shape ofthe loads and is such that no axialcomponent of internal force occurs. Thesecontain bending-type internal force only.Semi-form-active elements are elementswhose shapes are such that they contain acombination of bending and axial internalforces.

It is important to note that structuralelements can only be form-active in thecontext of a particular load pattern. There areno shapes which are form-active per se. Thecranked beam shape in Fig. 4.5, for example, isa fully form-active element when subjected tothe two concentrated loads, but a semi-form-active element when subjected to theuniformly distributed load.

Form-active shapes are potentially the mostefficient types of structural element and non-form-active shapes the least efficient. Theefficiency of semi-form-active elements depends on the extent to which they aredifferent from the form-active shape.

4.3 The concept of ‘improved’shapes in cross-section andlongitudinal profile

It will be remembered from the beginning ofSection 4.2 that the main reason for the lowefficiency of elements in which bending-typeinternal forces occur is the uneven distributionof stress which exists within every cross-section. This causes the material in the centreof the cross-section, adjacent to the neutralaxis (see Appendix 2), to be under-stressedand therefore inefficiently used. The efficiencyof an element can be improved if some of theunder-stressed material is removed and thiscan be achieved by a judicious choice ofgeometry in both cross-section andlongitudinal profile.

Fig. 4.7 The effect of cross-sectional shape on the efficiency with which bending-type load is resisted. (a)Thin card which has an inefficient rectangular cross-section. (b) Thin card folded to give an efficient ‘improved’ cross-section. (c) Thick card with inefficient rectangular cross-section and having equivalent strength and stiffness to the folded thin card

A similar situation exists with slab-type elements. Solid slabs are much less efficient in their use of material than those in which material is removed from the interior, as can be demonstrated by carrying out a simple experiment with card (Fig. 4.7). A flat piece of thin card has a very low bending strength. If the card is arranged into a folded or corrugated geometry the bending strength is greatly increased. The card with the folded or corrugated cross-section has a strength which is equivalent to that of a solid card with the same total depth; it is, however, much lighter and therefore more efficient.

In general, cross-sections in which material is located away from the centre are more efficient in carrying bending-type loads than solid cross-sections. Solid cross-sections are,of course, much simpler to make and for this reason have an important place in the field of architectural structures, but they are poor performers compared to the I- or box-shaped cross-section so far as structural efficiency is concerned. In the classification which will be proposed here, these two categories of cross-section are referred to as ‘simple solid’ and‘improved’ cross-sections.

The shape of an element in longitudinal profile can be manipulated in a similar way to its cross-section to improve its performance in resisting bending-type loads. The adjustment can take the form of alteration to the overall shape of the profile or to its internal geometry.

 
Fig. 4.8 The efficiency of a non-form-active element can be improved if its longitudinal profile is adjusted to conform tothe bending moment diagram so that high strength isprovided only where the internal force is high

To improve efficiency the overall shape is adjusted by varying the depth of the element:this is the dimension on which bending strength principally depends (see Appendix 2).If the depth is varied according to the intensity of bending (specifically to the magnitude of the bending moment) then a more efficient use of material is achieved than if a constant depth of cross-section is used. Figure 4.8 shows two beam profiles which have been improved in this way. They are deep at the locations where the bending moment is high and shallow where it is low.

The internal geometry of the longitudinal profile can also be improved by altering it to remove under-stressed material from the interior of the element. Examples of elements in which this has been done are shown in Fig.4.9. As in the case of cross-sectional shape the internal geometry of the longitudinal profile of an element will be referred to here as ‘simple solid’ or ‘improved’.

Fig. 4.9 The efficiency of non-form-active elements can be improved by selecting a shape in longitudinal profile inwhich material is removed from the under stressed centre
of the element

One type of ‘improved’ profile which is of great importance in architectural as well as all other types of structure is the triangulated profile (i.e. the profile which consists entirely of triangles) (Fig. 4.10). If an element of this type has loads applied to it at the vertices of the triangles only, then the individual sub-elements which form the triangles are subjected to axial internal forces only3(Figs4.11 and 4.12). This applies no matter what the relationship is between the pattern of loads and the longitudinal axis of the element, taken as a whole.
 
Fig. 4.10 A solid beam is less strong and rigid than a triangulated structure of equivalent weight

 
Fig. 4.11 An alteration of the geometry of a triangle can only occur if the length of one of the sides changes.Application of load to a triangle, which tends to distort its geometry, is therefore resisted by axial internal forces in the elements

 
Fig. 4.12 The axial-internal-force-only condition does not occur if load is applied to a triangulated structure other than at its joints

By eliminating bending stress from non-form-active elements the triangulated internal geometry allows a high degree of structural efficiency to be achieved. The advantage of the triangulated element over the other class of element for which this is true – the form-active element – is that no special overall form is required to produce the axial-stress-only condition. All that is required is that the internal geometry be fully triangulated and the external load applied only at the joints.Triangulated elements do not, however,achieve quite such a high degree of structural efficiency as form-active structures due to the relatively high level of internal force which occurs.

Certain bending-type elements with‘improved’ cross-sections are referred to as‘stressed skin’, ‘monocoque’ or ‘semi-monocoque’ elements to distinguish them from skeletal elements which consist of a framework of structural sub-elements covered by non-structural skin. The distinction is perhaps best seen in the field of aeronautical engineering by comparison of the structure of a fabric-covered ‘stick-and-string’ biplane with that of an all-metal aircraft (Fig. 4.13). In each case the fuselage is a structure which carries bending as well as other types of internal force, notably torsion. Aircraft structures must,of course, have a very high ratio of strength to weight. Form-active or semi-form-active arrangements are impractical, however, because the overall shapes of aircraft are determined from aerodynamic rather than structural considerations. The structures are therefore non-form-active and must have‘improved’ internal structures so as to meet the required levels of efficiency.

Fig. 4.13 The overall shapes of aircraft are determined
mainly from non-structural considerations, principally
aerodynamic performance requirements. The supporting
structures are therefore non-form-active, but the very high
priority which must be given to saving of weight results in
the adoption of configurations in which many
‘improvements’ are incorporated. (a) The fuselage and
wings of the ‘stick-and-string’ biplane have triangulated
structures of timber and wire. The fabric covering has a
minimal structural function. (b) The wings and fuselage of
the all-metal aircraft are hollow box-beams in which the
skin plays an essential structural role

In the case of the early biplane fuselage the fabric skin had virtually no structural function and the loads were carried entirely by the framework of timber and wire which, being fully triangulated, was an efficient type of structure with a high ratio of strength to weight. Its disadvantage was that its potential strength was limited firstly by the relative weakness of timber, and secondly by the difficulty of making efficient joints between the timber compressive elements and the wire tensile elements. As the size and speed of aircraft increased and stronger aircraft structures were required, the change to an all-metal structure became inevitable. The fabric skin was replaced by sheeting of aluminium alloy and the internal structure of timber and wire by ribs and longitudinal stringers also of aluminium alloy. In this more sophisticated type of aircraft structure, which is called a semi-monocoque structure, the metal skin acted with the ribs and stringers to form a composite structure called a ‘stressed-skin semi-monocoque’. Monocoque construction is the term used where the element consists only of the stressed skin.

 
Fig. 4.14 The fuselage of the all-metal aircraft is a non form-
active structure which is ‘improved’ at various levels.
The fuselage, taken as a whole, is a hollow box-beam.
‘Improvements’ of several types are incorporated into the
sub-elements which support the structural skin

In the semi-monocoque fuselage of an all-metal aircraft (Fig. 4.14), which is anon-form-active structural element with an‘improved’ cross-section, a very thin stressed skin is used which must be strengthened a tregular intervals by ribs and stringers to prevent local buckling from occurring. The technique of improvement may be seen to be operating at several levels. The fuselage, taken as a whole, is a non-form-active element with an ‘improved’ hollow-tube cross-section.Further ‘improvement’ occurs in the tube walls,which have a complex cross-section consisting of the stressed skin acting in conjunction with the strengthening ribs and stringers. These strengthening sub-elements are in turn‘improved’ by having cross-sections of complex shape and circular holes cut in their webs.

ape and circular holes cut in their webs.The all-metal aircraft structure is therefore a complicated assembly of sub-elements to which the technique of ‘improvement’ has been applied at several levels. The complexity results in a structure which is efficient but which is very costly to produce. This is justified in the interests of saving weight. Every kilo newton saved contributes to the performance of the aircraft so weight saving is allocated a very high priority in the design.

A similar application of the features which save weight can be seen in the field of vehicle design, especially railway carriages and motorcars. The structure of the modern railway carriage consists of a metal tube which forms its skin, spanning as a beam between the bogies on which it is mounted. It is a non-form-active ‘improved’ box beam. The structure of a motor car is similar: the steel car body acts as a beam to carry the weight of the engine, occupants, etc. between the road wheels (Fig. 4.15). As in the case of the aeroplane the overall forms of rail and road vehicles are determined largely from non-structural considerations, but the need to save weight is given a high priority in the design.Again the use of ‘improved’ non-form-active monocoque and semi-monocoque structures constitutes a sensible response to the technical problems posed.

Fig. 4.15 The metal body of a motor car is an ‘improved’
non-form-active beam which spans between the road wheels

The use of such elaborate forms of‘improvement’ as the monocoque or semi-monocoque stressed skin can rarely be justified on technical grounds in architectural structures because the saving of weight is nota sufficiently high priority to justify the expense of this complex type of structure. In the case of buildings, inefficient high-mass structures can actually be advantageous. They add thermal mass and their weight counteracts wind uplift.

The uses of the devices and configurations which produce efficient and therefore lightweight structures – the complex cross-section, the circular ‘lightening’ hole,triangulation of elements and profiling to conform to bending moment diagrams – are not always appropriate from the technical viewpoint in the context of architecture where they are justified technically only in situations in which an efficient, lightweight structure is required (see Chapter 6). They can, however,have another architectural function which is to form a visual vocabulary of structure.

The use of the devices associated with structural efficiency for stylistic purposes is discussed in Chapter 7. It might be observed here that where this occurs they are often used in situations which are in appropriate structurally. The devices of ‘improvement’ which were devised in the context of aeronautical and vehicle engineering have become, in the hands of modern architects,especially those of ‘high-tech’ architects, a visual version of the dead metaphor.

4.4 Classification of structural elements

The principles outlined in the preceding sections, concerned with the various devices hich can be used to improve the efficiency of structures, can form the basis of a classification system for structural elements.The primary categorisation is between form-active, semi-form-active and non-form-active elements because this is the most important factor in determining the level of efficiency which can be achieved. Elements are further classified according to the degree of ‘improvement’ which is present in their cross-sections and longitudinal profiles. The number of combinations and permutations is very large and a selection only of possibilities is illustrated in Table 4.1 to show the general principles involved. The least efficient shapes (non-form-active elements with simple shapes in both cross-section and longitudinal profile) are placed at the top of the table and the degree of efficiency present increases towards the bottom of the table,where the most efficient shapes – tensile form-active elements – are placed. Adistinction is made between line elements,such as beams, in which one dimension is significantly larger than the other two, and surface elements, such as slabs, in which one dimension is significantly smaller than the other two.

This system links the form, and therefore the appearance, of a structure with its technical performance and provides a basis for reading a building, or indeed any artefact, as a structural object. This is an important consideration for anyone involved with either the design of buildings or with their critical appraisal.

The system is based on the idea of efficiency: structural elements are classified according to the level of efficiency which they make possible in the resistance of load which is, of course, their principal function. The main objective of structural design, however, is the achievement of an appropriate level of efficiency rather than the maximum possible level of efficiency. The factors which determine the level of efficiency which is appropriate are discussed in Chapter 6. The discussion of whether or not an appropriate level of efficiency has been achieved cannot take place,however, in the absence of a means of judging efficiency. The system proposed here provides that means.

An aspect of the relationship between structure and architecture which has been touched on in this chapter is the possibility that the features associated with structural efficiency can be used as the basis of a visual vocabulary which conveys architectural meaning – the message being technical progress and excellence.

  Table 4.1